When I add my years in college, I’ve been reading and writing code accessing databases for over 20 years. The thing almost every single one of these projects has in common: database connection strings as clear text in your configuration, with the majority of them having a clear text password.
Years ago, we had an encrypted segment in our Web.config file with ASP.NET. This was rarely used in most teams because you could not easily see to which data store you were connected or if you had only two or all three connection strings in the config when connecting to multiple databases.
Luckily over time, new solutions arrived and a well-known one is putting your secrets in Azure Key Vault and retrieve the secret during deploy (most often) or run time. It is an improvement, but we still have a username/password combination. One of my very first actions on every new project I arrive at is getting that combination out of the Kudu service and connect to their database right from the portal. This usually is enough to open some eyes in the team.
Managed identity: removing passwords from code/config
I’ve blogged about Managed Identity in the past and hopefully you know this identity principle already, but in short: Managed identities provide an automatically managed identity in Microsoft Entra ID for applications to use when connecting to resources that support Microsoft Entra authentication. This means they no longer need passwords or tokens to be able to connect.
App Service configuration
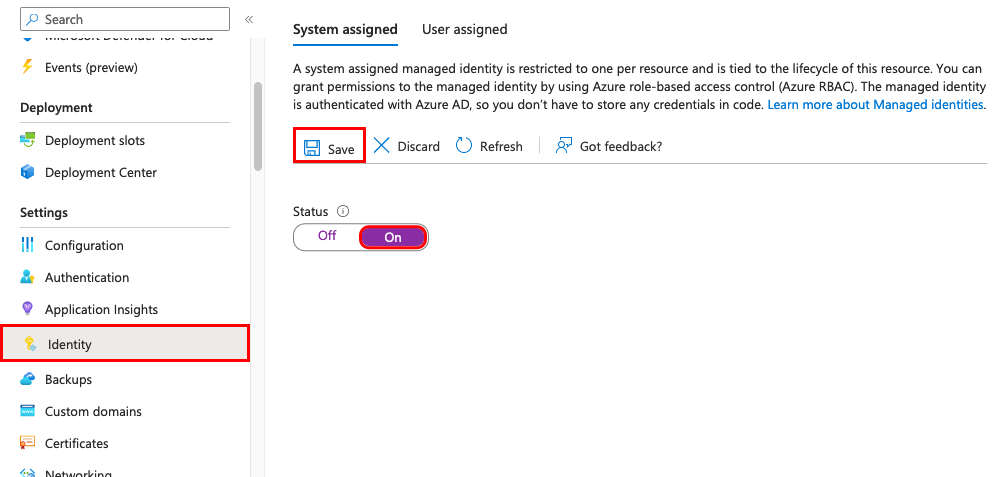
We start with a compute resource (Azure App Service) which needs to connect to a data store (Azure SQL) to retrieve data. On the Azure App Service, you can enable a managed identity through the Identity menu.
If you’re creating your App Service with Bicep, you’ll have to set the identity property:
resource symbolicname 'Microsoft.Web/sites@2022-09-01' = {
  name: 'string'
  location: 'string'
  identity: {
    type: 'SystemAssigned'
  }
  ...
}
Personally, I have been using the Azure Resource Module, which provides modules to easily configure resources. This library is currently being migrated to Azure Verified Modules. So following the latest version of AVM, you can read the following configuration sample on the GitHub repository:
module site 'br/public:avm/res/web/site:<version>' = {
  name: '${uniqueString(deployment().name, resourceLocation)}-test-wswamax'
  params: {
    // Required parameters
    kind: 'app'
    name: 'wswamax001'
    ...
    managedIdentities: {
      systemAssigned: true
      userAssignedResourceIds: [
        '<managedIdentityResourceId>'
      ]
    }
    ...
  }
}
As you can see, it is very similar, but it removes the knowledge of the string value of identity type (although you can fix that with defining the possible Bicep values to allow for auto-complete).
Setting up Azure SQL
Let’s take one step back and see what is required to set up an Azure SQL server before we configure the App Service Managed Identity.
Most of you have probably installed SQL Server on their dev machine or a server. One of the steps in the wizard was setting authentication where you could specify a ‘sa’ account password and usually added your current user as well in case of a dev box.
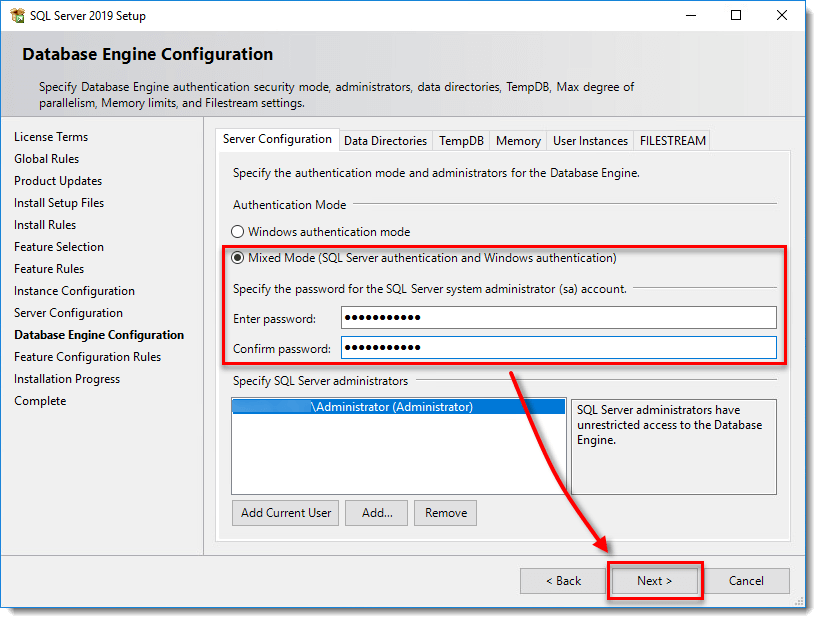
Azure SQL also follows the combination of SQL authentication and ‘Windows’ (through Entra ID) authentication.
SQL Logins are still useful in case of legacy applications, but bring a lot of disadvantages as well. Maybe even the most one not listed in the docs is the lack of MFA. For this you have to switch to Entra ID accounts. For something as important as the SQL system admin, I would expect to be able to use MFA and/or PIM.
Using Entra ID integration for administrators
You rarely have one single person in your (IT) team managing your SQL server. Levering Entra ID account also gives you a named audit trace which you would not have with a shared sa account. As soon as multiple persons are involved, I prefer to use security groups rather than assigning individuals.
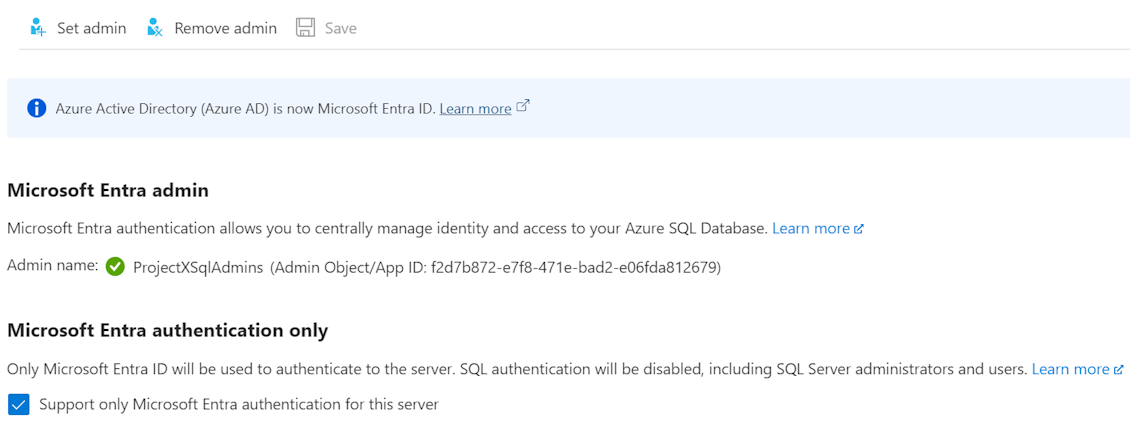
You could assign a security group as admin through the Azure Portal by going to the SQL Server (not the database) > Settings > Microsoft Entra ID.
I prefer to automate my Azure environment, as you typically end up with multiple environments and want to keep them in sync and documented. Let’s have a look at how to do this with Bicep. Notice that I’m using Azure Verified Modules to encapsulate some of the complexities.
module sqlServer 'br/public:avm/res/sql/server:0.1.2' = {
  name: resourceNames.sqlServer
  params: {
    name: resourceNames.sqlServer
    location: location
    tags: tags
    administrators: {
      administratorType: 'ActiveDirectory'
      azureADOnlyAuthentication: true
      principalType: 'Group'
      login: 'ProjectXSqlAdmins'
      sid: 'f2d7b872-0000-0000-0000-000000000000' // Entra ID object ID of the security group
      tenantId: subscription().tenantId
    }

    databases: databases
    ...
  }
}
Note: When I initially was setting up this environment 2 months ago, I had to assign myself as admin and then write SQL statements to add the security group as it was not possible to do it directly from Bicep back then. This triggered me to write this post, but re-testing my deployment I noticed it was fixed 👍.
Finally, we can verify that we have access by either using SQL Server Management Studio, CQLCMD command line or simply switch to the database in the Azure Portal and open the Query Editor. Since I’m member of the security group, you notice I can continue with my Entra ID user to log in.
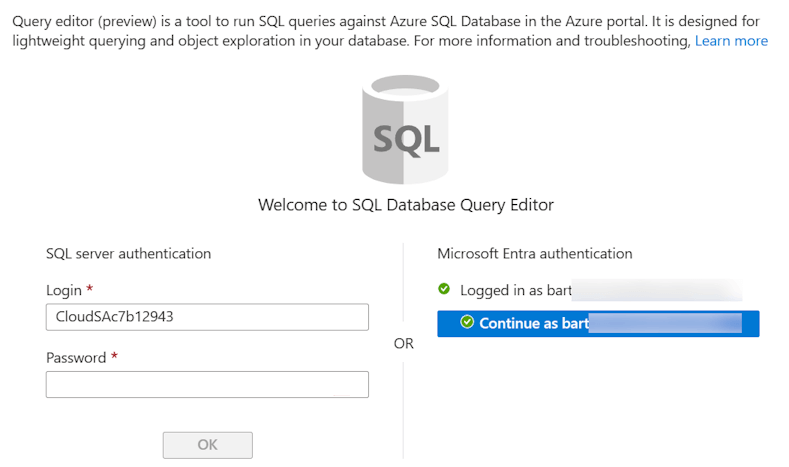
Fun fact: The Azure Portal prefills a SQL server login even though we do not support that authentication method.
Final step: add App Service Managed Identity as SQL user
Now we can combine everything and give the App Service access to Azure SQL. Again, we can choose to assign the identity directly or go through a security group. Log into the SQL database with SSMS or through the query editor and run following SQL commands:
CREATE USER [<identity-name>] FROM EXTERNAL PROVIDER;
ALTER ROLE db_datareader ADD MEMBER [<identity-name>];
ALTER ROLE db_datawriter ADD MEMBER [<identity-name>];
Note: identity-name is the name of the managed identity in Microsoft Entra ID. If the identity is system-assigned, the name is always the same as the name of your App Service app. To grant permissions for a Microsoft Entra security group instead, use the group’s display name.
The last step is to update our SQL Server Connection string in the appsettings.json file.
"ConnectionStrings": {
    "DefaultConnection": "Server=tcp:yourservername.database.windows.net;Authentication=Active Directory Default; Database=yourdatabasename;"
  },
As you can see, we’re no longer using a username or password. You could still offload this connection string to Azure Key Vault, but with this setup placing it directly in your configuration is no longer a huge risk. Add in a correct Virtual Network setup as an extra security layer and you’re more secure than most cloud applications.