One of the best things you can do to improve your software delivery is starting to automate your builds and deployments. The same counts for infrastructure, certain once you start looking at multiple environments. There are plenty of IaC tools out there, personally I’ve been using (and posted on) Bicep a lot lately.
Problem
CI/CD allows you to roll back to previous deployments rather easily. But messing around with Azure Resource Manager can become troublesome fast, certainly if you work with incremental deployments and don’t have a test environment that you can wipe completely. A possible use case might be your Azure Landing Zone where it might be too costly to duplicate all networking components for a second test environment.
Luckily Azure Resource Manager commands have a what-if flag that runs your complete ARM template against your Azure tenant, but outputs the changes that will be made rather than applying those changes.
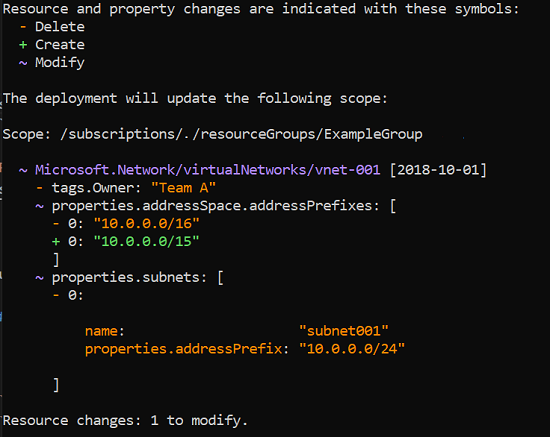
We have our CI/CD pipeline running and it would be nice to pause and be able to see the changes of a particular step before actually deploying to our Azure tenant. This can be solved in multiple ways and today we’ll focus on the multi-stage pipelines of Azure DevOps (which are slowly replacing class Releases pipelines).
For this example, we’ll be using the multi-stage Bicep Landing Zone Deployment from the previous post.
First try: Approvals and Environments
You can make a pipeline wait by adding a gate. There are plenty of options to wait on, for our case we’re looking at the built-in approval process combined with environments.
You can follow the setup on the official docs in detail, but in short, we’ll define a new environment and assign an approver.
Environment setup
Go to Environments, create a new environment and give it a useful name. Next, go into the details of the environment, open the action menu on the top right and select Approvals and checks.

Add a new check by clicking the + button on the top right, select Approvals and assign a user/group. The rest of the options can be left as default or be changed to your needs. This dialog also shows the other options described on the docs linked above.
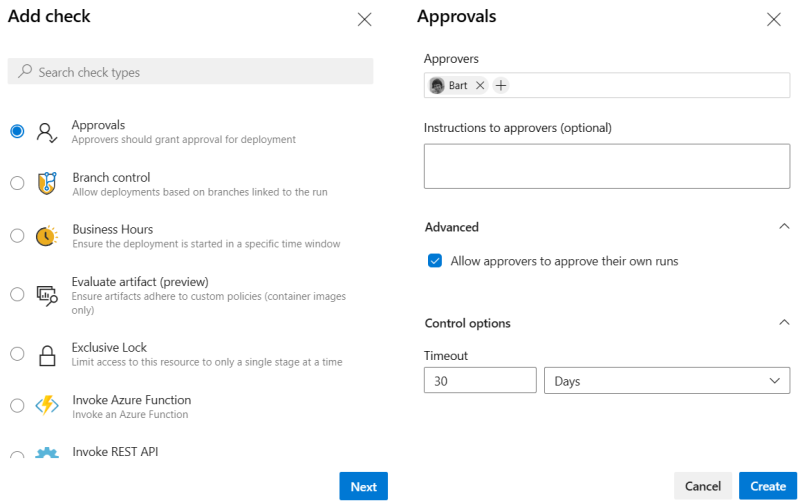
This completes the environment part as a prerequisite of our approval pipeline.
Add environment to the pipeline
The very first time I tried this, my initial thought was to simply slap the environment property on each job. But as mentioned in the previous post, only deployment jobs run against a specific environment.
This is our initial YAML fragment:
variables:
  ServiceConnectionName: "ALZPipelineConnection"
  ..

stages:
- stage: ManagementGroups
  displayName: Deploy Management Groups
  jobs:
  - job: DeplopyManagementGroups
    displayName: Deploy Management Groups
    steps:
    - task: AzureCLI@2
And since we have to convert the job to a deployment job, we’ll add some extra levels of elements and finally add the environment:
variables:
  EnvironmentName: "ALZ-Production"
  ServiceConnectionName: "ALZPipelineConnection"
  ..

stages:
- stage: ManagementGroups
  displayName: Deploy Management Groups
  jobs:
  - deployment: DeplopyManagementGroups
    displayName: Deploy Management Groups
    environment: $(EnvironmentName)
    strategy:
      runOnce:
        deploy:
          steps:
          - task: AzureCLI@2
Testing our changes
The very first time you try to run the pipeline with this deployment job and environment, you’ll have some extra work to do to set all permissions. The UI is pretty straight-forward. First you see the warning that the pipeline needs permission to the newly created environment and your stage is waiting.

Simply click the button and verify that the pipeline is trying to access the correct environment resource.
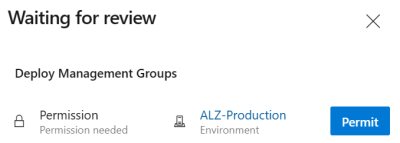
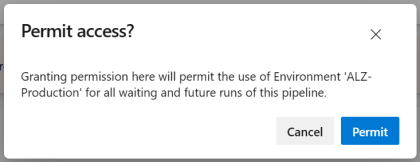
Finally, the pipeline can kick off, but it will almost instantly stall again, this time for the approval gate being triggered by the deployment job. This time anyone assigned as approver (in the environment configuration) can approve or reject the stage.
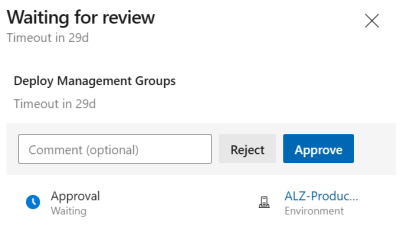
In case you did add a deployment job on each stage, you’ll get prompted between all stages to approve every single stage. Success!
Adding what-if
Let’s go back to our use case: we want to run a what-if command, review what would change and then do the actual deployment. Since my pipeline already has 6 stages I want to keep the check and deployment together in a single stage to prevent “stage-explosion” (and prevent the possibility to run deployment without verification).
My initial thought to build my stage:
- jobs:
jobwithwhat-ifcheckdeploymentfor actual deployment
This doesn’t look hard, and with a quick copy-paste you can test it within minutes. The job has a what-if command while the deployment job has a create command.
Note: you might want to use YAML templates to prevent too much copy-paste code resulting in a long unmaintainable pipeline.
stages:
- stage: ManagementGroups
  displayName: Deploy Management Groups
  jobs:
  - job: ValidateManagementGroups
    displayName: what-if Management Groups
    steps:
    - task: AzureCLI@2
      displayName: Az CLI Deploy Management Groups
      name: validate_mgs
      inputs:
        azureSubscription: $(ServiceConnectionName)
        scriptType: 'bash'
        scriptLocation: 'inlineScript'
        inlineScript: |
          az deployment tenant what-if \
          --template-file infra-as-code/bicep/modules/managementGroups/managementGroups.bicep \
          --parameters parTopLevelManagementGroupPrefix=$(ManagementGroupPrefix) parTopLevelManagementGroupDisplayName="$(TopLevelManagementGroupDisplayName)" \
          --location $(Location) \
          --name create_mgs-$(RunNumber)
  - deployment: DeplopyManagementGroups
    displayName: Deploy Management Groups
    environment: $(EnvironmentName)
    strategy:
      runOnce:
        deploy:
          steps:
          - task: AzureCLI@2
            displayName: Az CLI Deploy Management Groups
            name: create_mgs
            inputs:
              azureSubscription: $(ServiceConnectionName)
              scriptType: 'bash'
              scriptLocation: 'inlineScript'
              inlineScript: |
                az deployment tenant create \
                --template-file infra-as-code/bicep/modules/managementGroups/managementGroups.bicep \
                --parameters parTopLevelManagementGroupPrefix=$(ManagementGroupPrefix) parTopLevelManagementGroupDisplayName="$(TopLevelManagementGroupDisplayName)" \
                --location $(Location) \
                --name create_mgs-$(RunNumber)
We wouldn’t have a job if everything was that simple. Azure DevOps checks all the jobs in the collection (in our case two), notices there’s an approval on the second job and asks for approval before even starting the stage. Once you approve, the whole stage completely runs from start to end. That’s not what we want.
Second try: Manual approval between jobs
There are many different tasks available in Azure DevOps and one of them is ManualValidation@0 (version 0). This task allows you to pause the YAML pipeline and wait for manual interaction. Exactly what we need.
We usually have a lot of work to do and staring at our screen for a pipeline to stop at a given point isn’t very productive. Luckily this task can notify users. But even then you don’t want your agent to be blocked on the job idling for minutes, hours or even days. For this reason, we can move the task to a different job and make it run on the server rather than agent by using pool: server.
Finally, we’ll have to make sure to set the dependencies as otherwise the deployment task would still continue to run as soon as the agent frees up after the validate job.
stages:
- stage: ManagementGroups
  displayName: Deploy Management Groups
  jobs:
  - job: ValidateManagementGroups
    displayName: what-if Management Groups
    steps:
    - task: AzureCLI@2
      ..

  - job: waitForValidation
    dependsOn: ValidateManagementGroups
    displayName: Wait for external validation
    pool: server
    timeoutInMinutes: 60 # job times out in 1 hour, allows for running completely headless
    steps:
    - task: ManualValidation@0
      timeoutInMinutes: 60 # task times out in 1 hour
      inputs:
          # notifyUsers: |
          #     someone@example.com
          instructions: 'Please validate the what-if output and resume'
          onTimeout: 'resume'

  - deployment: DeplopyManagementGroups
    dependsOn: waitForValidation
    displayName: Deploy Management Groups
    environment: $(EnvironmentName)
    strategy:
      ..
One more detail
You might have seen your pipeline fail if you tested before and didn’t abort once you noticed the approval was asked at the wrong moment. It’s important to know that a deployment task does not clone/checkout the repository while a regular job does that implicitly.
Since we’re deploying directly from code (rather than using artifacts), these files won’t be available. This can be solved very easily by adding checkout: self to the job.
  - deployment: DeplopyManagementGroups
    displayName: Deploy Management Groups
    environment: $(EnvironmentName)
    strategy:
      runOnce:
        deploy:
          steps:
          - checkout: self
          - task: AzureCLI@2
Testing our changes
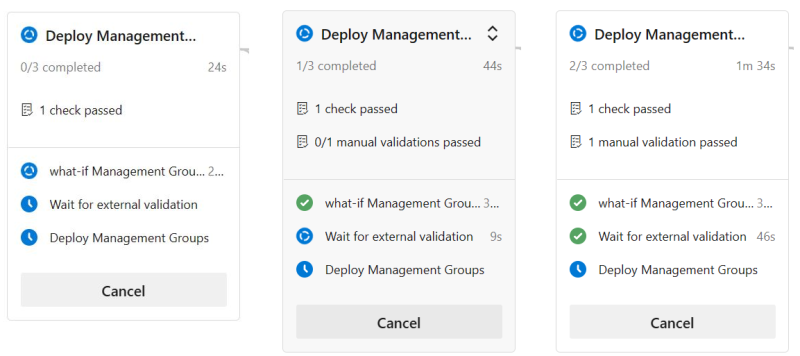
If all is set up correctly, you should have an approval before the stage runs and a second one in between the validation and deployment giving you the time to validate the output.
Conclusion
- Cutting a complex pipeline into stages allows for deploying separate parts independently. You can also use stages as multiple deployment targets (environments).
- Using the built-in approval process will trigger an approval check before the job runs.
- Using the ManualValidation@0 task (in a separate job) will trigger an approval check between jobs. Make sure to set dependencies.
- The combination of both validation gates allows for e.g. a product owner / manager to approve the deployment (complete stage) and a more technical person (IT, DevOps, …) to verify the actual deployment changes within the stage.