There are multiple ways to create an API, both in protocol and tooling. In this series we’ll focus on creating a REST API with .NET 5. We’ll expand the default template with libraries and practices to finish with an API that should cover most bases to run enterprise software on (keep in mind that this blog series is still demo code though, so I might a corner here and there for clarity). I’ll be using Visual Studio 2019, but you can follow along in Visual Studio Code or Visual Studio for Mac as well.
Note: at the time of writing .NET 6 is still in preview. Coming with .NET 6 there is the concept of Minimal API. Using Minimal API you can write a complete .NET API in a single file and no longer need most of the files I’ll be explaining below. While this is certainly a nice feature for very small APIs (for which you might be using Azure Functions as well), my (current) opinion is that you’ll still need a well structured project once you’re building a larger enterprise-quality API. Hence this series even though .NET 6 is around the corner. You can still use the concepts in this blog series in a .NET 6 project if you wish.
Prerequisites
- Visual Studio 2019 16.8 or later (Community Edition is free)
- .NET 5 SDK
Note that you can also follow along with Visual Studio Code or Visual Studio for Mac. If you need assistance in creating a new project, follow the link just below for the official documentation.
Getting started
Creating a new project
There’s quite some official documentation available on creating a new .NET WebAPI with .NET 5. You can simply go through File > New Project or dotnet new and scaffold the required structure of your project. Make sure to use an ASP.NET Core Web API and select .NET 5.0 (Current) as the target framework as this will scaffold a full solution structure that we’ll use in this series. We’ll call our project BirdAtlas.API.
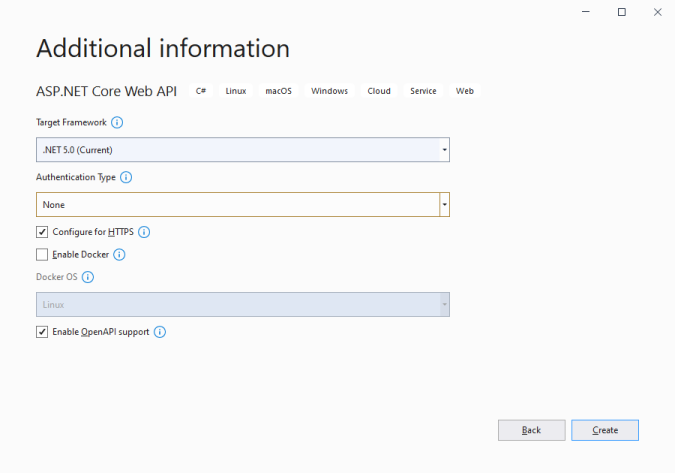
It’s a good practice to always enable HTTPS on your APIs (and any web resource). For now we’ll skip picking an authentication type (we’ll add Azure Active Directory later). You can enable OpenAPI support already, but we’ll come back to this in more detail in the next post.
Source version control
You’ll probably want to keep this code safe, share it with a team and even automate deployments. Git has become the industry standard since years, so we’ll put everything in a git repo. You’re totally free how you organize your code, but this is the structure I typically use. Having a single repository structure within your company will make onboarding other team members a lot easier and you’ll be able to start reusing CI/CD scripts etc.
You can use GitHub, Azure DevOps, BitBucket, GitLab or even another provider to store your git repos, often with a free tier. Either create your git repo locally, or create it on any of the platforms and clone it to get started. You can use git cli, the git tooling in Visual Studio or any visual git client (e.g. GitKraken) to do this.
Next up, make sure that the Visual Studio solution folder that you just scaffolded lives in the git repository folder and you’re good to go. I typically rename the solution folder name to src as by default Visual Studio names the solution (folder) the same as the initial project. This to have a consistent folder structure across multiple projects and be able to reuse e.g. build templates.
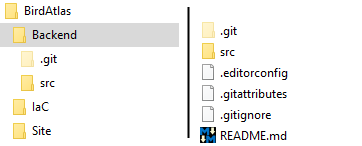
Under the BirdAtlas folder I cloned three different git repositories, with the Backend folder being the root folder of my git repo. As you can see, this has a hidden .git folder and my src folder. On the right side you again see the contents of the Backend folder. The extra files we’ll discuss below in the section ‘Enhancing your git repo’.
What did we get?
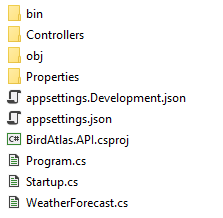
With the scaffolding of a new project, we get a handful of files. Since this is changing with .NET 6, I’ll limit the description to the concepts rather than the complete code.
Solution file
The solution file is the top level glue between your projects and uses the .sln extension. This file lists all project files that should be included and their build configurations. It also lists other ‘solution files’ that you included, which will be shown in the editor. A possible candidate for these extra files are CI pipelines that aren’t part of your actual code, but that you might want to edit from within the same editor.
Note that you can also add files (often project files) from outside your git repository folder structure. A common use case to do this is to be able to easier debug a reference library by adding the library’s project files directly. You should not commit these changes to your git repository as someone else will get a build error when trying to check out this commit as most likely they don’t have the referenced files outside your repository structure on disk.
Project file
The project file (**.csproj when using C#) has changed a lot of over the years from a cumbersome huge XML file to a very slim SDK-style XML file. With the more recent versions of .NET (and .NET Core), everything in the project folder is auto-included as ‘code’ in your project. This project file defines exceptions (exclude, build actions, …) and references to other projects or NuGet packages.
Next to project, package and file references, we also have the possibility to define project properties like target framework, NuGet package properties, … More info on this file format on Microsoft docs. For now we’ll stick to the basics, below is a sample scaffolded project file.
<Project Sdk="Microsoft.NET.Sdk.Web">

  <PropertyGroup>
    <TargetFramework>net5.0</TargetFramework>
  </PropertyGroup>

  <ItemGroup>
    <PackageReference Include="Swashbuckle.AspNetCore" Version="5.6.3" />
  </ItemGroup>

</Project>
Basic wiring
This part gets a major overhaul with .NET 6, but when using .NET 5 or sticking to the ‘old’ concepts for a more structured solution, you have a Program.cs file which is the entrypoint of your application and tells the runtime to use the Startup class for bootstrapping your API’s configuration. Next you have the Startup.cs file with this Startup class where you define everything needed to bootstrap and start the API.
When looking at the class, we can identify a constructor with dependency injection to receive the configuration, a ConfigureServices method to register everything required with the dependency container, and a Configure method to interact with the HTTP request pipeline configuration. With these methods, you should be able to configure almost everything you can think of regarding of APIs.
namespace BirdAtlas.Api
{
    public class Startup
    {
        public Startup(IConfiguration configuration)
        {
            Configuration = configuration;
        }

        public IConfiguration Configuration { get; }

        // This method gets called by the runtime. Use this method to add services to the container.
        public void ConfigureServices(IServiceCollection services)
        {
            ...
        }

        // This method gets called by the runtime. Use this method to configure the HTTP request pipeline.
        public void Configure(IApplicationBuilder app, IWebHostEnvironment env)
        {
            ...
        }
    }
}
Configuration
The big bulk of configuration in .NET 5 (or .NET 6, or ASP.NET Core) is done through appsettings.json as configuration file. This is no longer a rather rigid XML file like it used to be in the .NET Framework, but a very flexible JSON file. This will automatically get loaded by the CreateDefaultBuilder method in your Program class. Next to appsettings.json, you’re also able to define environment-specific settings files which will add onto or overwrite the general settings. By default this file only has some minimal configuration, which we’ll expand during this series:
{
  "Logging": {
    "LogLevel": {
      "Default": "Information",
      "Microsoft": "Warning",
      "Microsoft.Hosting.Lifetime": "Information"
    }
  },
  "AllowedHosts": "*"
}
There’s another useful configuration file being scaffolded under the Properties folder: launchSettings.json. This file is typically not committed to your git repository as it contains personal preferences on launching your project in debug mode. We’ll need to look modify this file later in the blog series. Most important here is to notice the applicationUrl and sslPort properties together with the launchUrl. When I debug this new project, a browser will open and navigate to https://localhost:44398/swagger/ as I defined I wanted to use HTTPS and am using the IIS Express profile to debug. If you’re running on another port, either update the port number now or take the difference into account whenever I post a localhost url.
{
  "$schema": "http://json.schemastore.org/launchsettings.json",
  "iisSettings": {
    "windowsAuthentication": false,
    "anonymousAuthentication": true,
    "iisExpress": {
      "applicationUrl": "http://localhost:65116",
      "sslPort": 44398
    }
  },
  "profiles": {
    "IIS Express": {
      "commandName": "IISExpress",
      "launchBrowser": true,
      "launchUrl": "swagger",
      "environmentVariables": {
        "ASPNETCORE_ENVIRONMENT": "Development"
      }
    },
    "BirdAtlas.Api": {
      "commandName": "Project",
      "dotnetRunMessages": "true",
      "launchBrowser": true,
      "launchUrl": "swagger",
      "applicationUrl": "https://localhost:5001;http://localhost:5000",
      "environmentVariables": {
        "ASPNETCORE_ENVIRONMENT": "Development"
      }
    }
  }
}
Controllers
When building a .NET API, you typically follow an MVC-style pattern: data lives in your Model, API interaction is handled by a Controller. If you’d build a UI, then you’d have a View as well. When only exposing an API, you could see the API response (in JSON, XML, …) as your view.
On scaffolding a new API, you already get a controller in WeatherForecastController.cs for free to show you the basics:
- An
[ApiController]attribute to tag this class as an API controller. - A
[Route]attribute to define the path to these endpoints. You can follow the proposed convention based on class name, or pick your own. - A constructor with dependency injection; by default only a
ILoggerinstance is injected to provide logging. You can add more dependencies as required and these will get resolved by the dependency container if registered correctly. - A
[HttpGet]method defining an endpoint on the controller’s path with HTTP GET as verb. You can use other HTTP verbs as required or add in a route parameter to define another (sub)path.
namespace BirdAtlas.Api.Controllers
{
    [ApiController]
    [Route("[controller]")]
    public class WeatherForecastController : ControllerBase
    {
        private static readonly string[] Summaries = new[]
        {
            "Freezing", "Bracing", "Chilly", "Cool", "Mild", "Warm", "Balmy", "Hot", "Sweltering", "Scorching"
        };

        private readonly ILogger<WeatherForecastController> _logger;

        public WeatherForecastController(ILogger<WeatherForecastController> logger)
        {
            _logger = logger;
        }

        [HttpGet]
        public IEnumerable<WeatherForecast> Get()
        {
            var rng = new Random();
            return Enumerable.Range(1, 5).Select(index => new WeatherForecast
            {
                Date = DateTime.Now.AddDays(index),
                TemperatureC = rng.Next(-20, 55),
                Summary = Summaries[rng.Next(Summaries.Length)]
            })
            .ToArray();
        }
    }
}
The scaffolded sample has an endpoint which will result some fake weather forecast data, so a WeatherForecast model is also added to the project. Running this project (F5 to debug locally, or deploy to an IIS server or the cloud) will give you some JSON data once you hit the following url: https://localhost:44398/weatherforecast.
Add more controllers and methods to start expanding your API. In the next blog posts we’ll cover more practices to keep everything organized, reduce code duplication and introduce storage, security and other necessary topics.
Enhancing your git repo
Next to the source code files and CI pipelines, I add in some extra files to enhance the developers’ experience when cloning the git repository. Most tools already scaffold some of these files when creating the git repository, but you can always add or edit them to your needs.
A very typical file is the README.md file which supports Markdown and usually is shown at the root page of your git repository. This file allows you to document the purpose of your code repository to give any visitors a quick start. Of course you’re able to link to more detailed documentation.
Adding git specific files
The next file is well known to anyone using git: .gitignore. This file keeps track of folders and files that should not be tracked by your git version control system. It supports pattern matching to make life a lot easier. Depending on the tooling or git platform you’re using, you might already get the suggestion of a template ignore file to help you get started. You typically don’t want to commit binaries that are the result of the build process or debug output during development as these will trigger changes almost every single time and have no added value in being stored as they can easily be rebuilt. I typically use the Visual Studio .gitignore file or something very similar.
Another file I always add is the .gitattributes file. The last thing you want when working on multiple operating systems (by yourself or with others) is having files marked as changed only because of different line endings. By using * text=auto git will normalize storing the files with a single format, and check out with platform specific line endings. This allows a Windows developer to have CRLF (carriage return and line feed) endings and a Unix developer to have LF (line feed only) endings. This file also allows to specify that certain file types are binary instead of text, which has an impact on comparison.
Finally the last file I’m adding to every code repository is an .editorconfig file. The editor config file allows you to define editor options (e.g. indent style and size), but also coding conventions to be shared by the team. As long as your editor supports this file, your code solution will try to follow the conventions set and possibly give suggestions, warnings or errors when not following the defined guidelines. While this is not a guaranteed solution, it’s already a good start to get a uniform code base.
Open source repositories
When working with open source repositories (or even on internal code bases) it can be useful to add a few more files to your git repository to further improve collaboration. Some examples are templates for issues and pull requests, a code of conduct, a sponsors file, a license file, … Check the platform you’re using to host your git repos and how they handle these files.
Disclaimer and code
Technology is always evolving. Most of the concepts in this blog series will be applicable in future releases of .NET, although actual code might change. Throughout the blog posts I’m linking to as much official documentation as possible, as this is updated by the product teams on a regular basis.
Code for this blog series is available at https://github.com/SanITy-BV/BirdAtlas-backend. We try to keep the repository updated with new principles and newer .NET versions as it is our primary tool for demoing. Code might change slightly from what is described in the blog post, this both because of simplification for the reader of this post and possible future updates in the codebase. Always review the code before using in production software. Please reach out if you’re having issues with following the blog post because of these possible changes.